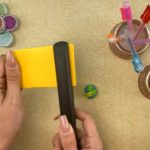
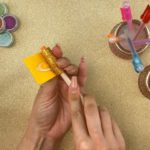
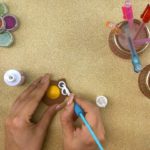
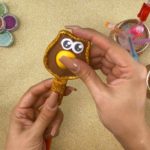
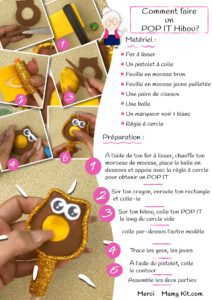
Facebook Youtube Instagram Pinterest Twitter Matériel: Fer à lisser Un pistolet à colleFeuille en mousse brunFeuille en mousse jaune pailletéeUne paire de ciseauxUne balleUn marqueur noirUn marqueur blancRègle à cercle Étape par étape Étape 1 À l’aide de ton fer à lisser, chauffe ton morceau de mousse, place la balle en dessous et appuie avec la règle à cercle pour obtenir un POP IT Étape 2 Sur ton crayon, enroule ton rectangle et colle-le Étape 3 Sur ton hibou, colle ton POP IT le long du cercle vide et colle par-dessus l’autre modèle Étape 4 Trace les yeux et les joues Étape 5 Assemble les deux parties Télécharge la fiche activité : ICI Te voilà avec un magnifique accessoire POP IT!Mamy Kit Facebook Twitter Pinterest LinkedIn Rechercher : Retrouve ici d’autres vidéo de POP IT : Lien Vidéo : POP IT OURSON KAWAIILien de l’article : POP IT OURSON Lien Vidéo : POP IT AVOCAT KAWAIILien de l’article : POP IT AVOCAT Lien Vidéo : POP IT KAWAIILien de l’article : POP IT CAROTTE Lien Vidéo : POP IT CORNET DE GLACE KAWAIILien de l’article : POP IT CORNET DE GLACE PrécédentPrécédentPOP IT LAPIN SuivantPOP IT LICORNESuivant WRITTEN BY mamykit 💜Bienvenue sur la chaîne de Bricolage Mamy Kit 💜 C'est l'endroit idéal pour découvrir des créations étonnantes. Laisser un commentaire Annuler la réponseVotre adresse e-mail ne sera pas publiée. Les champs obligatoires sont indiqués avec *Commentaire * Nom * E-mail * Site web Enregistrer mon nom, mon e-mail et mon site dans le navigateur pour mon prochain commentaire.
Étape 1 À l’aide de ton fer à lisser, chauffe ton morceau de mousse, place la balle en dessous et appuie avec la règle à cercle pour obtenir un POP IT